Deploying data with SQL Server Data Tools projects

We are using Visual Studio SQL Server Data Tools (SSDT) projects more and more. Initially we were using it for getting the database under source control but now we are also using it for deploying the database even with data included.

One way to include data is to add a script file in the SSDT project with ‘insert into’ statements but because our requirement was to include a lot of (meta)data everytime the project was build we came up with another solution.

In short:

  • in the post build event of the SSDT project in Visual Studio we export the data from the database to files in the build output directory with the SQL Server bcp utility
  • we created a Post Deployment script in the SSDT project to import the data from the files when the database is deployed

I will describe the solution based on the AdventureWorks sample database which can be downloaded from here. I used Visual Studio 2015, SQL Server Data Tools and SQL Server 2014.

Step 1

I created a new solution with two projects. The first project is a SSDT project. For simpilicity I have only included the table Person.CountryRegion in the project and some related objects like User Defined Types and a Schema.

SSDTSolution

Step 2

In the Post-build event of the project the SQL Server utility bcp is called to export the data to a file in the build output directory.

SSDTPostBuild

When building the project the data is exported to the file Person.CountryRegion.dat.

SSDTBuildOutput

Step 3

A Post-Deployment Script is added to the SSDT project.

PostDeploymentScript

PostDeployment

For inserting the exported data we are using a BULK INSERT statement. In this statement a SQLCMD variable is used with the name $(DataFiles). This variable must be set to the build output directory when deploying the database so it can find the Person.CountryRegion.dat file.

The SQLCMD variable is specified in the SQLCMD Variables tab of the project properties.

SSDTSQLCMD

Now everything is setup to create a dacpac file for deploying the database and also deploying the data.

I created a console application for testing the deployment of the dacpac file. The NuGet Package Microsoft.SqlServer.Dac is installed for the necessary assemblies to deploy a dacpac. There are also other ways to deploy a dacpac like SqlPackage.exe, PowerShell, etc.

SSDTCode

With the DacDeployOptions class we can set the SQLCMD variable DataFile to the build output directory. When we run the console application a database with the name AdventureWorksTest is created with the table Person.CountryRegion filled with data.

The Visual Studio 2015 solution can be downloaded from GitHub. Don’t forget to set the console application as Startup Project in Visual Studio. For running this example also SQL Server Data Tools and the AdventureWorks sample database is needed.


Microsoft Excel decimal key behavior in WPF

At Reasult we develop financial forecasting software for the Real Estate sector. We have to deal with a lof of numeric input values in our WPF applications.

Al lot of our customers are used to work with Microsoft Excel. When in Excel the decimal key on the numeric keyboard is pressed always the decimal separator specfied in the regional settings is used. This is not the way a normal Windows (WPF) application handles this key.

With the following piece of code you get the same behavior as Excel.

    public class DecimalKeyTextBox : TextBox
    {
        protected override void OnKeyDown(System.Windows.Input.KeyEventArgs e)
        {
            if (e.Key == Key.Decimal)
            {
                e.Handled = true;

                string decimalSeparator = System.Threading.Thread.CurrentThread.CurrentCulture.NumberFormat.NumberDecimalSeparator;
                TextCompositionManager.StartComposition(new TextComposition(InputManager.Current, this, decimalSeparator));
            }

            base.OnKeyDown(e);
        }
    }

Whenever the decimal key on the numeric keyboard is pressed the event is cancelled and the decimal separator specified in the regional settings is used.

A WPF ListBox which acts like an Apple style navigation bar

At Reasult we are currently working on a new UI style for our WPF applications. One of the UI elements we will use is an Apple style navigation bar.

With WPF is relative easy to create such kind of a control. The trick is to find a standard control which has the behaviour we need. In this case we need ´select item´ behaviour and the ListBox is a good candidate. The only thing we have to do is to change the default ListBox appearance.

Because I´am not a graphical designer I search the internet for some information about the styles Apple is using for the navigation bar. In the article The Apple.com navigation menu created using only CSS3 you can find a lot of style information. I tried to use all the style elements but some effects are not easy to create with WPF so I skip a few effects.

We start with creating the NavigationBar class which inherits from the ListBox.

public class NavigationBar : ListBox
    {
        static NavigationBar()
        {
            DefaultStyleKeyProperty.OverrideMetadata(typeof(NavigationBar), new FrameworkPropertyMetadata(typeof(NavigationBar)));
        }
    }

The first thing we must change in the appearance is the direction of the ListBox items. Default the items are showed in vertical direction but for the navigation bar we need items displayed in horizontal direction.


After that we have to override the default ListBox ControlTemplate. We need a transparent border with rounded corners which clips the content. In the article WPF – Easy rounded corners for anything you can read how to achieve this. The result is:


                            <!-- Rounded mask (stretches to fill Grid) -->
                            

                            <!-- Main content container -->
                            
                                <!-- Use a VisualBrush of 'mask' as the opacity mask -->


The next step is to define the style for the navigation bar items. First we create a NavigationBarItem class which derives from the standard ListBoxItem. The NavigationBarItem has a border and each border side has a different color. With the standard BorderBrush is not possible to assign different colors to every border side. To achieve this a custom BorderBrush is used.


Now all the style elements which are needed are defined and we can use the Apple Navigation Bar:


And the final result in a WPF application looks like:

The Visual Studio 2010 solution can be downloaded from here

Localization (multi language) of a RDLC report with Microsoft ReportViewer

In the previous post I wrote how to use the Microsoft ReportViewer with a report and a subreport in a WPF application. In this post I’am going to describe how you can localize a RDLC report because out of the box there is no support for localization. With localization I mean that all the labels, table headers, etc are being translated depending on a language setting in the application.

Because a RDLC report is just an ordinary XML file we execute the following steps to translate a report:

  1. load the report in a XML Document object
  2. find all the nodes with a specific attribute
  3. the value of this attribute is the actually name of a term in a resource file (*.resx)
  4. replace the value of this node with value retrieved from the resource file

I use the Visual Studio solution of my previous post about the ReportViewer as a starting point.

The report TextBox control has a property called ValueLocID. This property we use to store the name of a translated term which is stored in a resource file.

In the XML of the RDLC report the TextBox control property ValueLocID is stored in the LocID attribute of a Value element. The value of this attribute we are going to use to translate and replace the innerText of the Value element.


  true
  true


          Customer:
          
            Bold


Before the report is loaded into the ReportViewer we are going to translate the report with a helper class. In line 16 we load the report definition as a Stream object. This Stream object is the input for the TranslateReport method of the RdlcReportHelper class. The same steps are done for the subreport. In line 11 we set the current UI culture to Dutch (Netherlands) so all the TextBox controls which have a value set for the ValueLocID property are translated into Dutch.

void MainWindow_Loaded(object sender, RoutedEventArgs e)
{
    // get the customers from the OData service
    IEnumerable customers = Repository.GetCustomers();
    // get a reference to the WinForms ReportViewer control
    Microsoft.Reporting.WinForms.ReportViewer reportViewer = (Microsoft.Reporting.WinForms.ReportViewer)windowsFormsHost.Child;
    // subscribe to SubreportProcessing event for passing the related Orders data
    reportViewer.LocalReport.SubreportProcessing += new SubreportProcessingEventHandler(LocalReport_SubreportProcessing);

    // Change the CurrentUICulture to Dutch (Netherlands)
    Thread.CurrentThread.CurrentUICulture = new System.Globalization.CultureInfo("nl-NL");

    // the report is included as an embedded resource in the assembly
    // load the report as a stream from the assembly
    Assembly assembly = Assembly.GetExecutingAssembly();
    Stream reportStream = assembly.GetManifestResourceStream("Wpf.ReportViewer.CustomerReport.rdlc");
    // translate the report
    reportStream = RdlcReportHelper.TranslateReport(reportStream);
    // load the report
    reportViewer.LocalReport.LoadReportDefinition(reportStream);

    Stream subreportStream = assembly.GetManifestResourceStream("Wpf.ReportViewer.OrdersReport.rdlc");
    // translate the subreport
    subreportStream = RdlcReportHelper.TranslateReport(subreportStream);
    // load the subreport
    reportViewer.LocalReport.LoadSubreportDefinition("Wpf.ReportViewer.OrdersReport.rdlc", subreportStream);

    // the CustomerReport has one dataset which must be filled
    reportViewer.LocalReport.DataSources.Add(new ReportDataSource("CustomerDataset", customers));
    // now let the ReportViewer render the report
    reportViewer.RefreshReport();
}

In the TranslateReport method of the RdlcReportHelper class we create a XDocument object from the Stream object. Then we iterate through all the Value elements. If a Value element has a LocID attribute we trying to find the translated term in a resource file using the value of the attribute.

public static class RdlcReportHelper
{
    public static Stream TranslateReport(Stream reportStream)
    {
        XDocument reportXml = XDocument.Load(reportStream);

        foreach (var element in reportXml.Descendants(XName.Get("Value", @"http://schemas.microsoft.com/sqlserver/reporting/2008/01/reportdefinition")))
        {
            XAttribute attribute = element.Attribute(XName.Get("LocID", @"http://schemas.microsoft.com/SQLServer/reporting/reportdesigner"));

            if (attribute != null)
            {
                string translatedValue = Resources.ReportResources.ResourceManager.GetString(attribute.Value);
                element.Value = string.IsNullOrEmpty(translatedValue) ? element.Value : translatedValue;
            }
        }

        Stream ms = new MemoryStream();
        reportXml.Save(ms, SaveOptions.OmitDuplicateNamespaces);
        ms.Position = 0;

        return ms;
    }
}

The Visual Studio 2010 solution can be downloaded from here

Showing a report with a subreport in the ReportViewer control which has a OData service as datasource in a WPF application

The Microsoft ReportViewer control is a powerfull control for embedding reports in a .Net application. There are two versions of this control: a WinForms version and a WebForms (Asp.Net) version. Unfortunately there is no native WPF version available at this moment but it is possible to use this control in a WPF application as explained later in this post.

The ReportViewer control has a number of advantages:
– is a freely redistributable component
– is able to show RDLC (Report Definition Language Client-side) format reports when the control is in local mode
– is able to show RDL ((Report Definition Language) format reports from a SQL Service Reporting Service (SSRS) when the control is in remote mode
– can export reports to Excel, PDF and Word (and additional formats when running in remote mode) without having Excel, Adobe Reader or Word installed
– supports print preview

In this post I’am going to show how to:
– use the ReportViewer control in a WPF application
– use an OData service as a datasource for the report
– use a report with a sub report

Using the ReportViewer control in a WPF application

As mentioned before the ReportViewer control is not available as a native WPF control but only as a WinForms and WebForms control. With the WPF WindowsFormsHost control is possible to host WinForms controls in a WPF application so also the WinForms ReportViewer control.

To use the WindowsFormsHost control together with the WinForms ReportViewer control you must add references to the following assemblies:
– WindowsFormsIntegration
– System.Windows.Forms
– Microsoft.ReportViewer.WinForms

After adding the references you can use the ReportViewer control in XAML.


Using an OData service as datasource

The RDLC reports can use many different sources as datasource. In this post I’am using the public available Northwind OData service as datasource. To use this service add a service reference in a Visual Studio project (in my case a WPF application) to http://services.odata.org/Northwind/Northwind.svc.To retrieve data from this datasource I created a Repository class which is responsible for communicating with the service.

public static class Repository
{
    public static IEnumerable GetCustomers()
    {
        return NorthwindEntitiesDataService.Customers;
    }

    public static IEnumerable GetOrdersForCustomer(string customerId)
    {
        return NorthwindEntitiesDataService.Orders.Where(o => o.CustomerID == customerId).Take(5);
    }

    private static NorthwindEntities _NorthwindEntitiesDataService;

    private static NorthwindEntities NorthwindEntitiesDataService
    {
        get
        {
            if (_NorthwindEntitiesDataService == null)
            {
                _NorthwindEntitiesDataService = new NorthwindEntities(new Uri(@"http://services.odata.org/Northwind/Northwind.svc"));
            }

            return _NorthwindEntitiesDataService;
        }
    }
}

This Repository class will be used later in this post.

Report with a subreport

We will use two reports: a (main) report which shows customers (CustomerReport.rdlc) and a subreport (OrdersReport.rdlc) which shows the related orders. The CustomerReport uses the Customer dataset from the service reference as datasource and the OrdersReport will use the Customer (Orders) dataset as datasource.

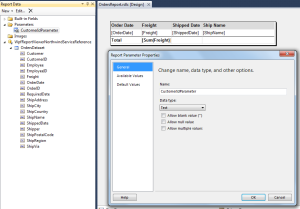
In the subreport a parameter (CustomerIdParameter) is defined which is used for passing the customer Id from the CustomerReport to the OrdersReport (subreport) so the related orders can be retrieved and shown.

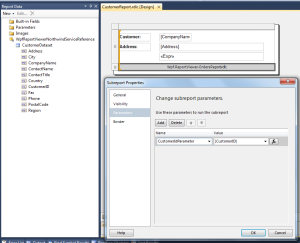
This parameter has to be filled in the CustomerReport. Therefore we have to specify in the properties of the subreport in the CustomerReport which field from the customer dataset is used for filling this parameter.

The reports are now ready to show the data. The last thing we have to do is telling the ReportViewer control to show this report. We already placed the ReportViewer control in a XAML file. In the code behind of the XAML file we have to add some code.

public partial class MainWindow : Window
{
    public MainWindow()
    {
        InitializeComponent();
        this.Loaded += new RoutedEventHandler(MainWindow_Loaded);
    }

    void MainWindow_Loaded(object sender, RoutedEventArgs e)
    {
        // get the customers from the OData service
        IEnumerable customers = Repository.GetCustomers();
        // get a reference to the WinForms ReportViewer control
        Microsoft.Reporting.WinForms.ReportViewer reportViewer = (Microsoft.Reporting.WinForms.ReportViewer)windowsFormsHost.Child;
        // subscribe to SubreportProcessing event for passing the related Orders data
        reportViewer.LocalReport.SubreportProcessing += new SubreportProcessingEventHandler(LocalReport_SubreportProcessing);
        // the report is included as an embedded resource in the assembly
        // use the full name
        reportViewer.LocalReport.ReportEmbeddedResource = "Wpf.ReportViewer.CustomerReport.rdlc";
        // the CustomerReport has one dataset which must be filled
        reportViewer.LocalReport.DataSources.Add(new ReportDataSource("CustomerDataset", customers));
        // now let the ReportViewer render the report
        reportViewer.RefreshReport();
    }

    void LocalReport_SubreportProcessing(object sender, SubreportProcessingEventArgs e)
    {
        // our subreport has only 1 parameter
        string customerId = e.Parameters["CustomerIdParameter"].Values[0];
        // our subreport has only 1 dataset
        string dataSourceName = e.DataSourceNames[0];
        // get the orders for the current customer
        IEnumerable orders = Repository.GetOrdersForCustomer(customerId);

        e.DataSources.Add(new ReportDataSource(dataSourceName, orders));
    }
}

Because we are using a subreport we have to subscribe to the SubreportProcessing event of the ReportViewer. Each time a customer is rendered in the CustomerReport this event is fired. In the event arguments the value of the CustomerIdParameter is passed which we will use to retrieve the related orders from the OData service. After retrieving the orders data we fill the dataset for the subreport.

The Visual Studio 2010 solution can be downloaded from here

WPF Command and claim/role based security

In the company I work (Reasult) we use Windows Identity Foundation (WIF) for claim based security in our software. By specifying the RoleClaimType you can indicate which claims are representing the user’s roles. With the general Thread.CurrentPrincipal.IsInRole method you can check if the current user has one of those roles. The roles are used in the WPF application to check if an user is allowed to execute a certain action. Most of the time those actions are WPF Commands.

We were looking for a nice and clean way to specify which role an user must have to execute a certain Command. Therefore we created a custom attribute which can be set on the Execute method of a Command. In this AuthorizationAttribute you can specify which role the user must have so he is allowed to execute the action.

[AttributeUsage(AttributeTargets.Method)]
public class AuthorizationAttribute : Attribute
{
    public AuthorizationAttribute()
    {

    }

    public AuthorizationAttribute(AuthorizationType authorizationType, string role)
    {
        AuthorizationType = authorizationType;
        Role = role;
    }

    public string Role { get; set; }
    public AuthorizationType AuthorizationType { get; set; }
}

The AuthorizationAttribute has two properties. A Role property for specifying the role and an AuthorizationType property (enum) which indicates if you must have the role (Allow) or the user must not have that role (Deny).

The AuthorizationAttribute can be used in the ViewModel on the Execute method of the Command. The type of command we are using is a relay/delegate command. For an explanation what a relay command is read the following article of Josh Smith WPF Apps With The Model-View-ViewModel Design Pattern

public class ViewModel
{
    public RoleBasedSecurityCommand MyCommand { get; set; }

    public ViewModel()
    {
        MyCommand = new RoleBasedSecurityCommand(Execute, CanExecute);
    }        

    [AuthorizationAttribute(AuthorizationType.Allow, "Admin")]
    private void Execute(object o)
    {

    }

    private bool CanExecute(object o)
    {
        return true;
    }
}

If the current user has the role Admin he is allowed to execute the command. The RoleBasedSecurityCommand class definition is shown here:

public class RoleBasedSecurityCommand : ICommand
{
    private readonly Action _Execute;
    private readonly Predicate _CanExecute;
    private bool _IsAuthorized;

    #region Constructors

    public RoleBasedSecurityCommand(Action execute)
        : this(execute, null)
    {
    }

    public RoleBasedSecurityCommand(Action execute, Predicate canExecute)
    {
        if (execute == null)
            throw new ArgumentNullException("execute");

        _Execute = execute;
        _CanExecute = canExecute;

        _IsAuthorized = IsAuthorized(_Execute.Method);
    }

    #endregion

    private bool IsAuthorized(MethodInfo methodInfo)
    {
        bool isAuthorized = true;

        var authorizationAttributes = (AuthorizationAttribute[])methodInfo.GetCustomAttributes(typeof(AuthorizationAttribute), true);

        if (authorizationAttributes.Count() == 0)
        {
            return true;
        }

        foreach (var authorizationAttribute in authorizationAttributes)
        {
            if (authorizationAttribute.AuthorizationType == AuthorizationType.Allow)
            {
                isAuthorized = Thread.CurrentPrincipal.IsInRole(authorizationAttribute.Role);
            }
            else if (authorizationAttribute.AuthorizationType == AuthorizationType.Deny)
            {
                isAuthorized = !Thread.CurrentPrincipal.IsInRole(authorizationAttribute.Role);
            }

            if (isAuthorized == false)
            {
                break;
            }
        }

        return isAuthorized;
    }

    #region ICommand Members

    public bool CanExecute(object parameter)
    {
        if (_IsAuthorized)
        {
            return _CanExecute == null ? true : _CanExecute(parameter);
        }
        else
        {
            return false;
        }
    }

    public event EventHandler CanExecuteChanged
    {
        add { CommandManager.RequerySuggested += value; }
        remove { CommandManager.RequerySuggested -= value; }
    }

    public void Execute(object parameter)
    {
        _Execute(parameter);
    }

    #endregion
}

The RoleBasedSecurityCommand class is based on the relay command of Josh Smit but in the constructor the IsAuthorized method is executed. This method will read the AuthorizationAttribute attributes specified on the CanExecute method and check if the user has a certain role (Allow) or must not have a certain role (Deny). When the CanExecute method is called by the WPF framework and the user is not authorized it will return false. If a button is bind to this command it’s automatically disabled because we make use of the ICommand interface.

The RoleBasedSecurityCommand is just a basic implementation to work with role based security. It can be extended to support more complex role checks.

Source code can be downloaded from here. To test the application you can assign a role to the current user in the code behind of MainWindow.xaml

Excel accounting style column for WPF DataGrid

For our WPF applications we had a requirement that the WPF DataGrid must be able to show amounts just like the Excel accounting format. In short this means: currency symbol aligned to the left and the amount aligned to the right within a column. Default such column is not available but with some effort it is relative simple to create this kind of a column.

First we create a control which shows an amount like the Excel accounting style.


public class AccountingCell : Control
{
    static AccountingCell()
    {
        DefaultStyleKeyProperty.OverrideMetadata(typeof(AccountingCell), new FrameworkPropertyMetadata(typeof(AccountingCell)));
    }

    public string Amount
    {
        get { return (string)GetValue(AmountProperty); }
        set { SetValue(AmountProperty, value); }
    }

    public static readonly DependencyProperty AmountProperty =
        DependencyProperty.Register("Amount", typeof(string), typeof(AccountingCell), new UIPropertyMetadata(null));
}

The AccountingCell control derives from Control and has one extra dependency property of type string which is named Amount. The DataGridHelper class (line 10) is just a helper class which reads the currency symbol from the regional settings (Current culture).

The next step is creating a DataGridAccountingColumn class which derives from the DataGridTextColumn. A dependency property is added for setting the number of decimal digits used for formatting the amount. We override the GenerateElement method which is responsible for creating the elements when the cell is not in edit mode.

public class DataGridAccountingColumn : DataGridTextColumn
{
    protected override FrameworkElement GenerateElement(DataGridCell cell, object dataItem)
    {
        AccountingCell accountingCell = new AccountingCell();

        Binding newBinding = new Binding(((Binding)Binding).Path.Path);

        string decimalPattern = new String('0', DecimalDigits);
        string accountingFormat = "{0:#,##0." + decimalPattern + "}";
        newBinding.StringFormat = accountingFormat;
        // Ensure the current culture passed into bindings is the OS culture.
        // By default, WPF uses en-US as the culture, regardless of the system settings.
        newBinding.ConverterCulture = System.Threading.Thread.CurrentThread.CurrentCulture;

        accountingCell.SetBinding(AccountingCell.AmountProperty, newBinding);

        return accountingCell;
    }

    public int DecimalDigits
    {
        get { return (int)GetValue(DecimalDigitsProperty); }
        set { SetValue(DecimalDigitsProperty, value); }
    }

    public static readonly DependencyProperty DecimalDigitsProperty =
        DependencyProperty.Register("DecimalDigits", typeof(int), typeof(DataGridAccountingColumn), new UIPropertyMetadata(2));        

}

In the GenerateElement method we create an AccountingCell object and create a new binding based on the orginal column binding because we cannot change the orginal binding. On the new binding we set the StringFormat property so the amount is properly formatted.

Now we can use the accounting column as follows:


As you can see the result is a column which shows the amount just like the Excel accounting format.

Source code can be downloaded from here.

Alignment of WPF DataGrid header

In the previous post I described how you can wrap the text in the column header of the WPF DataGrid. In this post we are going to extend the style so is also possible to align the header text. The default alignment of the header text is left.

First we create 3 styles, one for each alignment possibility (left, center and right alignment).

<Style x:Key="LeftAlignmentColumnHeaderStyle" TargetType="{x:Type DataGridColumnHeader}" BasedOn="{StaticResource WrappedColumnHeaderStyle}">
    <Setter Property="HorizontalContentAlignment" Value="Left"/>
</Style>

<Style x:Key="CenterAlignmentColumnHeaderStyle" TargetType="{x:Type DataGridColumnHeader}" BasedOn="{StaticResource WrappedColumnHeaderStyle}">
    <Setter Property="HorizontalContentAlignment" Value="Center"/>
</Style>

<Style x:Key="RightAlignmentColumnHeaderStyle" TargetType="{x:Type DataGridColumnHeader}" BasedOn="{StaticResource WrappedColumnHeaderStyle}">
    <Setter Property="HorizontalContentAlignment" Value="Right"/>
</Style>

In the styles above we use the BasedOn property so the style is based on the WrappedColumnHeaderStyle we created in the previous post. The property HorizontalContentAligment is used for setting the alignment because in the default control template of the DataGridColumnHeader this property is used for aligning the content of the header.

In the column definitions we can set the HeaderStyle to a specific alignment style.

<DataGrid ItemsSource="{Binding }" AutoGenerateColumns="False">
    <DataGrid.Columns>
        <DataGridTextColumn Header="Long header text (alignment = left)" HeaderStyle="{StaticResource LeftAlignmentColumnHeaderStyle}" Width="50" Binding="{Binding Name}"/>
        <DataGridTextColumn Header="Long header text (alignment = center)" HeaderStyle="{StaticResource CenterAlignmentColumnHeaderStyle}" Width="50" Binding="{Binding Name}"/>
        <DataGridTextColumn Header="Long header text (alignment = right)" HeaderStyle="{StaticResource RightAlignmentColumnHeaderStyle}" Width="50" Binding="{Binding Name}"/>
     </DataGrid.Columns>
</DataGrid> 

As you can see in the picture below the header text is aligned.

There is one issue we have to fix. For wrapping the text we make use of a TextBlock. This TextBlock is correctly aligned but when the text is wrapped the text lines in the TextBlock are always aligned to the left within the TextBlock. To solve this we extend the WrappedColumnHeaderStyle with some data triggers which set the TextAlignment property of the TextBlock to the correct value.

<Style x:Key="WrappedColumnHeaderStyle" TargetType="{x:Type DataGridColumnHeader}">
    <Setter Property="ContentTemplate">
        <Setter.Value>
            <DataTemplate>
                <TextBlock x:Name="TextBlock" TextWrapping="Wrap" Text="{Binding}"></TextBlock>
                <DataTemplate.Triggers>
                     <DataTrigger Binding="{Binding Path=HorizontalContentAlignment, RelativeSource={RelativeSource FindAncestor, AncestorType={x:Type DataGridColumnHeader}}}" Value="Center">
                        <Setter TargetName="TextBlock" Property="TextAlignment" Value="Center"/>
                    </DataTrigger>
                    <DataTrigger Binding="{Binding Path=HorizontalContentAlignment, RelativeSource={RelativeSource FindAncestor, AncestorType={x:Type DataGridColumnHeader}}}" Value="Left">
                        <Setter TargetName="TextBlock" Property="TextAlignment" Value="Left"/>
                    </DataTrigger>
                    <DataTrigger Binding="{Binding Path=HorizontalContentAlignment, RelativeSource={RelativeSource FindAncestor, AncestorType={x:Type DataGridColumnHeader}}}" Value="Right">
                        <Setter TargetName="TextBlock" Property="TextAlignment" Value="Right"/>
                    </DataTrigger>
                </DataTemplate.Triggers>
            </DataTemplate>
        </Setter.Value>
    </Setter>
</Style>

As you can see in the picture below also in case the text is wrapped the alignment for all text lines is correct.

Text wrapping in WPF DataGrid column header

The WPF DataGrid does not support out of the box wrapping of the text in the column headers. With a small style adjustment it’s possible to wrap the text in the header.

First we create a new style for the DataGridColumnHeader class. In this style we only set the property ContentTemplate so the orginal style is not touched. The ContentTemplate is set to a DataTemplate which contains a TextBlock. The TextWrapping property of this TextBlock is set Wrap. This way we have a column header with the header text wrapped.

<Style x:Key="WrappedColumnHeaderStyle" TargetType="{x:Type DataGridColumnHeader}">
    <Setter Property="ContentTemplate">
        <Setter.Value>
            <DataTemplate>
                <TextBlock TextWrapping="Wrap" Text="{Binding}"></TextBlock>
            </DataTemplate>
        </Setter.Value>
    </Setter>
</Style>

In the columns of the DataGrid we set the HeaderStyle property to the new style.

<DataGrid ItemsSource="{Binding }" AutoGenerateColumns="False">
    <DataGrid.Columns>
        <DataGridTextColumn HeaderStyle="{StaticResource WrappedColumnHeaderStyle}" Header="Long header text" Width="50" Binding="{Binding Name}"/>
    </DataGrid.Columns>
</DataGrid> 

As you can see in the picture below the header text is wrapped when the text is too long for the column width.